Working in the studio

The health and safety of working in the studio is you should always be cautious of all power supplies and cables making sure they are all neatly placed, assuring that no one is capable of tripping over dangling wires which may have been misplaced so all electrical equipment must be fully checked which also includes the checking of equipment in case of existing supply.
Health and safety in the studio is highly important because theres so many dangerous opportunities waiting to happen so you've always got to be cautious and double check everything before starting your shoot.
Important tips while in the studio/health and safety
Electricity is highly dangerous and must never be misused while operating with it because it can cause serious damage or in some cases death.
Never attempt to repair lights or wiring because if you catch your fingers on the bulb or you haven’t switched off the electrical supply then you are more likely to be electrocuted so always ask/tell a teacher who can help assist or replace the equipment in case of defects of the bulbs/wiring.
Always be cautious when moving or connecting lights because you can cause injuries to you or someone else either by tripping over wires or pulling equipment over because you haven’t put the supplies close enough to an electrical supply or not added an extension.
Always turn the power off when you are changing the head of the lights because it can become very hot and can scold you if touched too soon so always let it cool before proceeding with changing the different heads.
Never touch any part of a light or a cable with wet hands because you can cause the water to get into the electrical system which could blow the equipment or it can give you an electrical shock, you should also never use liquids near equipment because the consequences are the same as if you had wet hands near the equipment.
Always wear shoes with rubber soles so electricity can’t run through your body and it’ll prevent you from being electrocuted.
Make sure you know where a first aider is while in the studio in case of emergencies i.e. someone falling over and either spraining their ankle or breaking a wrist.
Ensure you know where and how to use the fire extinguisher in case of a fire if you believe it is in a controllable state whereas if it wasn’t you would have to evacuate the building following all the emergency procedures related to the work area in your department i.e. making sure you follow the correct steps and go to the safe area.
Always make sure there is adequate ventilation so the studio is able to have a good circulation of air running through it in case you’re in there for a long period of time.
Equipment used in the studio
The different types of equipment which can be used in the studio can range from small equipment to large with a variety of different lighting heads which produce either harsher or softer light onto someone or an object.
Studio Lighting (Bowens, Interfit, Lastolite, Elinchrom.)
Light Meter
Reflector
DSLR Camera
Radio/IR trigger kit - Sync lead
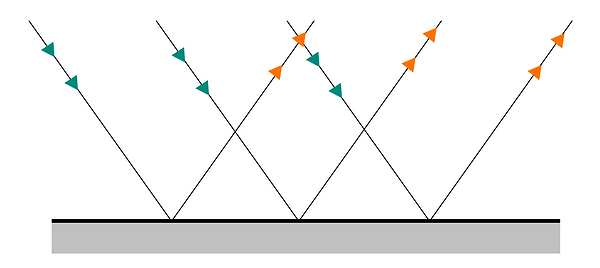
Inverse Square Law
The inverse square law relates the intensity of a light source to the illumination it produces at any given distance. One-stop increments are spread over a wider area the further the light travels.
Light can be diffused and it can be reflected and it can be deflected but it also travels which means that over time and distance its intensity can and will diminish the further away the light is, when we move one stop from f/22 to f/16 in a matter of inches but we move one stop from f/4 to f/2.8 over the course of a few feet.
In the diagram, the beam of light can be seen fanning out quite quickly and the object furthest from the light receives only a small proportion of the light, most of the beam misses the object which is the furthest away.
If the light read f16 when the object is only at a distance of 1 metre then at 2 metres the reading would become f8, this doesn’t change even if the light source is different.
Task
Too safely set up a single light source and to be able to take a meter reading of our light source, once you have taken a reading step back and repeat, note down all setting within the light meter and what happens to the light output.
During the process of setting up the single light source I discovered it was a very simplistic transition to make to be able to put it together you’ve just got to be cautious with the wires and the electricity and making sure you put the power cable into the back of the light before plugging it into a main supply to stop the possibility of electrocution, as a group we constructed the light carefully to its tripod ensuring it was secure and tight to prevent falling, we also checked the stands of the tripod to ensure they were fully spread out to ensure the structure wasn’t going to tip over or be easily pushed.
When we checked the meter reading of our light source we realised the big difference it makes when moving back and forwards because the further away you are the higher the meter reading will become so if your closer to the light at f8 and move backwards it would become f5.6, and that can also be adjusted if you either dim or higher the light density, so if your standing at f8 and the light isn’t bright then you can higher or lower it so it lowers the meter reading to f5.6.
Diffusion
Light is the main component for every photograph that someone would take and it comes in many different forms and produces a variety of different results when being used and some of these types of lights are diffused, backlit and reflected.
Diffused light – diffused light softens the edges of the shadows and increases shadow detail, it isn’t harsh and direct onto the subject which you are photographing, the light falling on the subject is also decreased making the subject look more flattering. The amount of diffusion casted on to the subject is also determined by where the diffusing material is placed in relation to the light source and the subject.
Backlight – This is where you illuminate your subject from the back rather than the front, this helps silhouette your subject or give them a glow, this will give the subject a 3D perspective as well rather than the 2D effect, it’ll separate the background and the subject and make it more enhancing.
Reflected Light – Reflected light can be found everywhere, it’s on most surfaces which radiate a glossy/shiny look towards it, reflected light is literally the light that is reflected from a particular surface or material i.e. if you were shooting a portrait which was stood next to a white building, the light would bounce off the white wall and reflect onto the subject making the photograph more enhancing,
reflected light tends to be soft and takes on the colour
which its being reflected from so if you were to use
a gold/brassy toned reflector it would reflect that
colour onto your subject which would define the
model, it can be used to reflect light into shadowed
areas, it’s used in the areas which the dominate light source cannot reach.
What material / items could be used as a reflector? – The materials which you could use to make a reflector is simple tinfoil wrapped around a piece of cardboard, you could also use white paper or card, it would give the same softening and pleasing effect of illuminating the face and enhancing the features of the subjects as if you were relying on a professional reflector.
Studio Photographers
Rankin
Richard Avedon
David Bailey
Annie Leibovitz
Nigel Barker
Each photographer which I have searched for and found examples of their work, which are above all show similar lighting, they all particularly like the concept of black and white portraiture photography.
The idea that black and white expresses more emotion signifies the fact that this is the reason behind their purpose of editing them into black and white however they could just generally like the way portraits are perceived through black and white and how they look all together.
however looking through their examples which I have displayed shows much more than expressions, you're able to see definition and details within the models faces/body, the figures of the models are more bold and I believe black and white brings out these marks because your able to adjust the lighting and contrast within an editing software i.e photoshop to define certain areas and bring out the features of the model, changing the concept/meaning behind the photographic piece.
Lighting Quality
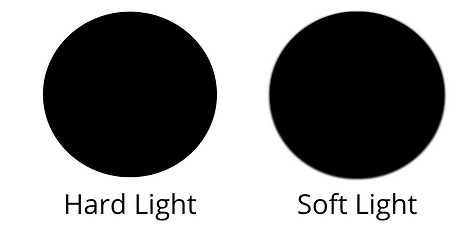
There are two basic types of light and thats hard light and soft light.
- Hard light is highly directional and creates a very sharp, straight shadow which gives the photograph a more dramatic look - hard light is created when the light source is smaller than the object.
A light which would give this effect is a bare bulb studio light.
- Soft light fills shadows and lowers the contrast of the skin, soft light is able to wrap around the subject and contour the features - soft light is created when the light is larger than the relative subject.
A light which would give this effect is an umbrella (transmitted or reflected) or a soft box (increased diffusion.)
Light Reflection
There are two types of light reflection - Specular Reflection and Diffused Reflection.
- Specular Reflection is a type of reflection which reflects off objects such as mirrors or a calm body of water.
Diffused Reflection
Diffused reflection is created by reflecting light from rough surfaces such as materials like paper and in inside of a photographic umbrella which leads to a type of reflection known as diffuse reflection.
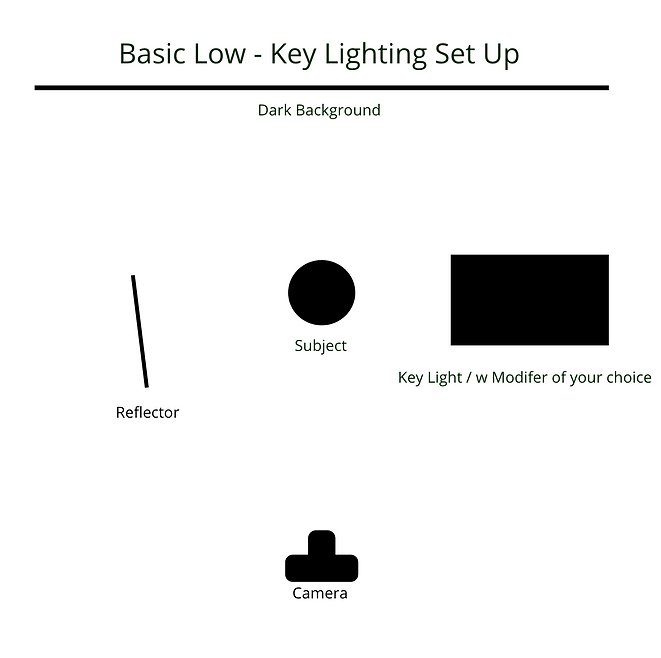
Hi Key Lighting
Hi key lighting should never be confused with over exposed photographs, the reason behind this is because a true hi key composition will show a full tonal range i.e black and white however the lighter tones will be more pronounced and dominate whereas overexposed images will not have any dark tones.
The subjects which are used within this type of photography is children - traditionally -
Hi key lighting is set up as two lights pointing on the backdrop/background to provide an overall highlight, there is then a main light pointing directly onto the models face and this is so that little shadows are created.
This photograph is an example of how this effect is used,
it shows how there is an overall highlight which is produced
and this minimises flaws on the face.
This is a common set up to be used because it gives
a fresh and smooth finish to the photograph.
The lighting set up is very basic, all you need is 3 lights - with 2 of the lights on the background however you have to be careful of the flare, you would then place a main light in front of the model.
When setting up the lights you have to different stops between the front and rear lights i.e if the front lights are f8 then the rear lights must be f16 - the lights are metered independently to get a more accurate balance.
Overall the exposure mainly comes from the main light which will produce the effect on the models face.
Task - Produce hi-key photographs & artist research
Richard Avedon
Richard was best known for his photography work for fashion and as well as his minimalist portraits.
He first worked as a photographer for the Merchant Marines, taking identification photographs, he then moved onto fashion photography, taking photographs for Harpers Bazaar and Vogue however he demanded that his models show more emotion and movement which is a departure from the normal motionless fashion photography.
Richard expanded the genre of photography with his surreal and provocative fashion photography as well as portraits that bared the souls of some of the most important and opaque figures in the world.
Richard was born on the 15th of may 1923 In new work city.
Richard created elegant black and white photographs throughout the 1940s and 1950s which showcased the latest fashions in real life settings i.e Paris Picturesque Cafes, Cabarets and Streetcars.
He made fashion and photography history in 1955 when he staged a photoshoot at a circus, the iconic photograph of that shoot, “Dovima with Elephants,” features the most famous model of the time in a black Dior evening gown with a long white silk sash - even today that image remains one of the most strikingly original fashion photographs of all time.
Richard Avedon passed away on the 1st of October 2004.
Annie Leibovitz
Annie is considered one of Americans best portrait photographers.
She was born on October 2nd 1949 in Waterbury Connecticut - in 1970 she landed a job at Rolling Stone and went on to create a distinctive look for the publication as chief photographer.
In 1983 she began working for the entertainment magazine 'Vanity Fair', she continued to produce images that were deemed iconic and provocative.
Annie has worked on high-profile advertising campaigns, her images have been showcased in several books and major exhibitions around the world.
She was in a 15 year relationship with Sontag but that ended due to Sontags death in 2004 as well as her father passing away just weeks later - the two women traveled globablly and found interconnections with their work - Sontag encouraged Leibovitz to become more intimate with her photography - Annie is the mother of three children at the age of 51 - she has three daughters, 2 of which were born with the help of a surrogate mother (twins) and daughter Sarah born in 2005.


Subject
Light
Subject
Light


Low Key Lighting
Low key photography utilises dark tones to create a dramatic looking image whereas high key lighting seeks too over light the subject to the point of reduced contrast, low key lighting intensifies the contrast in an image by reducing light.
The key aspects of using low key lighting is not produce a dark image but to use lighting very selectively so that specific portions of the image are illuminated.
- Light absorption ( Black material or paper )
- To show Texture and detail
- Soft box ( To soften light and wrap around subject )
- Hard / soft light ( Strong shadows )
What do you think of these following photographs?
What I think of this photograph is that its being used to advertise a sport hence why they've placed the limited amount of light around the facial features and the chest area to emphasis the muscles structure - it definitely brings out the physical side of the sport that it is trying to advertise.
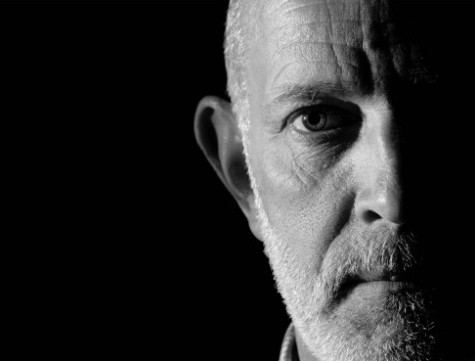
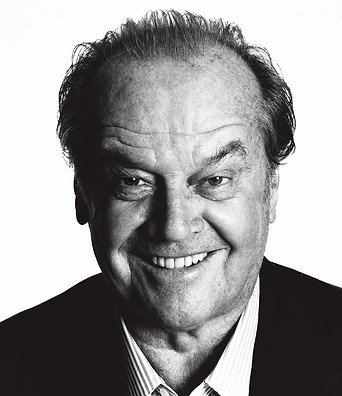
This photograph makes you feel uncomfortable because of the eye-contact that the model is showing; as well as only half of the face being visible it makes it even more daunting and mysterious, it gives the effect of fear due to the way he has been photographed.
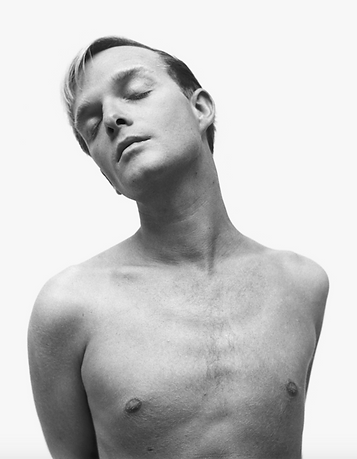
This photograph portrays different emotions to the other two by the way they've had the model positioned - he's looking down in despair and emphasis the emotions of 'sorrow' he might be feeling.
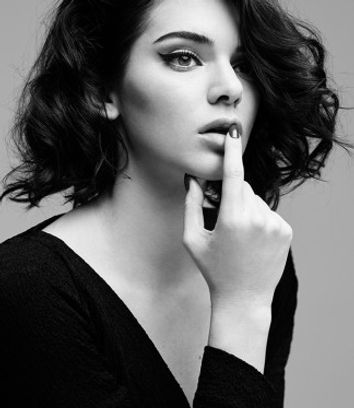
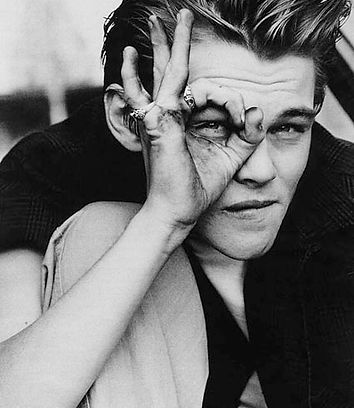
This photograph symbolises a more curiosity feel towards it because you have that feeling of what could she be looking at, the way her face is expressed as well makes you think that is she looking at someone or something, its a very interesting photograph it engages you in to what she might be thinking and why.
These photographs have a different perspective, it seems as if he maybe praying because of the way that the model has been positioned, it makes you feel as if he is asking for help and this makes you as a person sympathise with him because you want to know what he maybe thinking about while praying and why he might be praying.